I love traveling with my camera. For one, my memory is terrible and having photos to look back on helps me remember the details of a trip 10x better (even if I just took the trip last week). I mean, who doesn’t want to remember every single meal they ate in Italy?! Second, taking pictures is serious fun. I love all the ridiculous situations you can get into trying to get the perfect shot in a foreign environment and the satisfaction of nailing it. For example: a spontaneous portrait against the backdrop of the lights and noise of a city in Japan, or hiking a mountain and getting an unbelievable panorama of that hard-earned landscape.
That said, getting beautiful travel shots doesn’t have to cost a fortune, but it doesn’t come for free either. I can barely think about having to replace my favorite gear! You just can’t compare the results of a point-and-shoot to those of a camera with interchangeable lenses. I’ll be the first to say, it takes a long time to build up a multi-purpose collection, but even the initial investment can take a lot of saving to make it happen. That’s why keeping my gear safe while I’m traveling is always at the forefront of my mind. Here’s how I keep my gear (and myself) safe while traveling with a camera.
This post contains affiliate links. If you choose to buy one of the fantastic products I use, I’ll earn a small comission at no cost to you. This post was not sponsored in any way.

Keep a record of your gear
At some point in a photographer’s life, she acquires too many lenses to take everything with her on every trip. If you’ve reached that point, consider making a list of the lenses (and other gear) that you bring with you when traveling, along with the serial numbers of that gear. Should anything go missing (or should you think it’s gone missing, but in fact you left it at home accidentally), you have a record of what’s on your person. This is especially important if you have to make an insurance claim against lost or stolen equipment. Keeping a list is just generally a good idea, so you don’t have to worry about where all your funny papers went that you got with the camera or lens.
Keep the camera close
First example: take your camera with you as a carry-on. If possible, don’t store it in the overhead compartments on the plane, keep it under the seat in front of you. While the camera may be robust enough to handle a little jostle, there are other more fragile things (like lens filters) that can be cracked or scratched on contact. You never know how desperate someone is to fit their slightly oversized suitcase into the easyjet overhead!
Second, don’t leave your camera on the table during dinner or drinks. For one, people are sloppy creatures (especially aftering imbibing a bit) and just because the camera might be weatherproof doesn’t mean that it’s also wine-proof. In fact, the sugars in wine can really cause corrosion (one reason I keep a keyboard cover for my MacBook >_>) The tabletop location is also easy-pickings for a thief if you’re sitting outside, especially cities where tourists are heavily targeted.
Lastly, I would say: use the freaking neckstrap! I often wear the camera cross-body like a purse if it’s moving around too much while walking. Simply holding the camera in your hand is not safe, even if the camera is small and you feel secure in your grip. Similarly, when transferring the camera to someone else, wrangle them in by transfering the neckstrap. It also makes it harder for a passerby to snatch out of your hands. Camera safety first!
If you’re on the market for a neck strap, check out my post on my favorite camera strap for mirrorless cameras for an in-depth review.
Going through customs with camera equipment
I don’t think it’s common to be “inspected” on your way through customs. The only time this has happened to me was when flying home from the United States after Christmas (those clever Germans just knew I must have something worth taxing!!). But if you are called out when landing in your destination, make sure you’re not traveling with your equipment in their original boxes or packaging. This can make it look like you went on a nice trip to a place with better camera sales and are importing a loooot of money in goods, perhaps with the intent to resell.
If you do so happen to visit another country to buy camera gear, de-box it and rough it up a little if needed. It’s unlikely to happen to you, but the last thing you want is to be forced to produce proof of purchase for the item that basically incriminates you. I’ve watched this happen on weird German cop shows, where they bust people buying cheap electronics in America – don’t end up on weird German cop shows. (That said, I would never encourage you to break the law – do the right thing 😉)

Be aware of your surroundings
I will tell you one common safety tip I do not follow: I do not store my camera at all times when I’m not using it. It’s always around my neck or on my shoulder, so I’m ready at any moment to take a spontaneous shot when the situation presents itself. There’s just too much I would miss if my camera were always stored away in its 100% safe home in my purse. I mean, do you think street photographers keep their camera in their pocket until they see something photo-worthy? Heck no!
However, I do think it’s important to consider the relative risk depending on where you go. In Japan, I felt totally safe walking around at all hours with my camera out and ready. In Paris, I would only keep my camera out when I’m with other people in a more populated area. And even then, I am hyper-aware of what’s happening around me and keeping the camera towards the front of my body so it’d be harder to snatch from behind.

Be inconspicuous
Having a big camera makes you stick out – literally. I call them DSLR tourists, but it doesn’t necessarily have to apply to people with DSLRs – you can also get a mammoth telephoto lens for a mirrorless camera. The point is that walking around casually with massive gear draws attention to you, which is probably not the most desireable if you’re walking around the city. I understand bringing massive gear on a safari, but it’s just not warranted on your average city trip. Unless you’re like…a professional pigeon photographer. Maybe you need that.
One of the dozens of reasons I love Fujifilm cameras is how much smaller and less conspicuous they look. You’d never guess that Gernot has about $800 hanging around his neck – and with this tiny beast he makes awesome photos (see: both photos of me in this post). Similarly with my camera – most people say it looks like a film camera. And who wants to mug you for a film camera?! Keeping a low profile can be stylish, too 😉
Maybe ditch that dedicated camera bag
A camera bag can be recognized from a mile away, and any thief just KNOWS there are thousands of dollars worth of valuable glass and metal to be found within. Consider getting a bag that looks like a normal bag (such as the super stylish but ungodly expensive Ona bags) or a backpack that looks like a normal day bag. In my opinion, almost anyone walking around with a highly utilitarian backpack looks like a tourist, but at least your stuff will be securely attached to your back instead of easily slipped off the shoulder.
On that note, consider “de-branding” your camera
Besides size, just having big names like Canon and Nikon emblazened on your camera gear and neck strap can easily cause unwanted attention. On the one hand, it’s nice for the camera company that you are basically a walking billboard for their product, but you might want to consider using matte black gaff tape to hide the make and model of your camera if you’ve got a really expensive one. Further, neckstraps are like advertisement from all angles, so think about investing in a quality no-brand neckstrap. These are readily available from Amazon (or your favorite local camera shop) but be sure to check the reviews and be scrupulous with respect to the quality – a shoddy camera strap means camera crashing to the ground (trust me, I learned this from experience!).

Keep your equipment dry
I had such an immense struggle doing this while I was in Japan for cherry blossom season this year. In case you weren’t aware: cherry blossoms happen in Spring….which is also when rain happens. By the end I’d macgyvered a way to hold an umbrella with a pocket in my purse so I could take photos with both hands (a necessity when it’s cold and dark, because you can’t use a fast shutter speed). Still, it’s not a perfect system. Every time I transfered my camera to someone else beneath an ad hoc umbrella bridge, I was a total stress case. I think my boyfriend wanted to me chill out about it, but I just couldn’t! In the end, I’m very lucky that the water my camera was exposed to didn’t cause damage.
The biggest things that helped keep my stuff dry was the rain cover for my backpack, which I repurposed for the day bag. This way I know all my camera equipment will stay dry even when the umbrella doesn’t reach all the way over my bag (or I’m too busy using it to protect my camera).
Another thing you can do is get a waterproof case or bag for your camera, which even makes it safe to take UNDERWATER. Now, I don’t have one, but I’ve been dying to pick one up. I’ve read some <a href="https://fujifilm-blog.com/2014/08/11/taking-the-x-t1-into-the-deep-blue/” target”_blank">cool <a href="http://macleancomms.blogspot.de/2016/06/underwater-with-fujifilm-x-t1.html” target”_blank">blog posts about taking a mirrorless camera underwater, and the most common underwater camera bag is relatively inexpensive at less than $100.
…or, get a weather resistant camera
Not so long ago, I upgraded from my entry level camera to one with weather resistance – meaning, I can use it in the rain and temperatures down to -10ºC / 14ºF, no problemo (though <a href="https://fujifilm-blog.com/2016/10/07/extreme-field-test-of-the-fujifilm-x-pro2-and-x-t2/” target”_blank">some people take their Fuji cameras into the Arctic, YOLO). I also now have two lenses that are weather resistant, so I can go into basically any weather conditions and use my camera safely. What a relief!
Canon and Nikon also offer weather resistant cameras, it might be worth checking whether you can upgrade your existing body to something weather resistant if you often find yourself traveling to (or living in) rainy places. Of course, weather resistant only makes sense in conjunction with weather resistant lenses, so it could rack up the cost. I would argue it’s better to get a brand new lens than have to replace one because it got bricked by water damage.

Don’t expose your camera to dramatic temperature changes
As winter approaches rapidly, the difference in temperature between indoors and outdoors increases dramatically. In fact, just today I switched on the heating in my flat! The unfortunate consequence is that temperature differences like this can cause condensation to form inside the camera (creating more than just a foggy lens), and even weather resistant cameras aren’t weather resistant on the inside.
You can combat this by bringing a plastic bag with you, so that after spending some time shooting outdoors in the cold, the camera goes in the camera bag (while you’re still outside in the cold), and the condensation forms on the outside of the bag rather than on the inside of your camera. You should let the camera and lens stay in the bag for about two hours after coming indoors.
Extreme cold also affects battery life, so be sure to bring extra batteries if you’re planning a trip to Iceland this winter because the ones you think you know won’t last as long! However, the good news is that you can usually warm them up by keeping them in your pockets, and some “charge” will return to them so you can use them again before recharging.
Another cold-weather pro-tip is to keep batteries close to your body so they stay warm. Stick them in your pocket or at least insulate them so they’re not exposed to the cold as much. In fact, you can also apply this to the camera body itself (stick it under your coat!) as well as any flash unit you may be using.
<a href="https://www.bhphotovideo.com/explora/photography/tips-and-solutions/infographic-essential-tips-cold-weather-photography” target”_blank">Read more about cold weather photography here
Pack only what you’re going to use
When traveling, one of the biggest conundrums has to be: do I really need this? On the one hand, you don’t want to miss a shot because you left the equipment at home, but on the other – you don’t want sore shoulders after a full day of walking around and shooting. Plus, the more equipment you bring, the more can be damaged in a freak rainstorm or even stolen. Taking less equipment minimizes the risk in all directions.
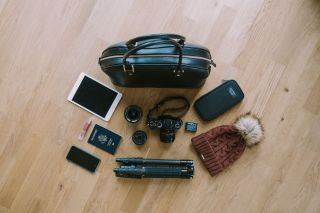
But what is the minimalist’s travel camera kit? Clearly it depends on who you ask and what they want to shoot. To give you an idea of what I’m walking around with, here’s what’s in my camera bag when I’m walking around these days:
- My
babycamera ( Fujifilm X-T1 ) - One wide angle lens ( Fujinon XF 16mm f1.4 ) – architecture, interiors, & environment.
- One walk-around lens ( Fujinon XF 23mm f2 ) – street and city photography.
- One bokeh monster lens ( Fujinon XF 35mm f1.4 ) – “magic moments” & low light.
- My lightweight carbon travel tripod ( Rollei Compact Traveler Tripod )
- Thin case for filters, spare memory cards
- Two pouches for the lenses that aren’t attached to my camera at the time, plus one that holds a microfiber cloth, spare batteries, the lens hoods, and a tiny mounted flash unit.
*In case you’re wondering about the 27mm I laud as my favorite lens for travel photography, this one is now being used full-time by my boyfriend who inherited my old camera! Right now he’s using it to make some truly gorgeous shots of the Pacific Northwest.
The awesome thing about this collection is that everything fits comfortably in my medium-sized purse, with the exception of my tripod which could fit, but is easier to carry using the shoulder strap (it’s so light you don’t even notice it’s there). My dirty secret is that since my boyfriend has a camera too, I always have access to a second camera and a fourth lens, just in case 😉
A note on the tripod: It is really not strictly necessary unless you are intending to take long exposure shots, and surely attracts unwanted attention. You either just have to own it, or go with a more pocktable model that you can place or tie around an existing surface.
Insurance insurance insurance
All the safety tips in the world can’t prevent something unexpected from happening to your camera. Often it’s possible to add coverage for your camera gear to your existing house contents insurance. Just don’t forget that some policies may require that very expensive items are filed in advance (i.e. if they cost more than $1k), so keeping the receipts for such things is important!
Back up your photos!
Perhaps even more precious than your physical camera are the photos you take with it. Don’t wait until your memory card is full to start transferring photos to an external hard drive or the cloud (preferably both). The only way to really keep your photos safe is to duplicate them!
I personally use Google Drive / Google Photos to back up from a 2TB external hard drive , which allows me to use one service to store my RAW files and share my pictures. It also makes it easy to have access to tons of photos from my computer when I’m on the go!
However, if you’re going to be on the road long term, you might want to consider one of the “durable” hard drives that is more resisant to being bumped around and exposed to the elements. This depends on your style of travel and the environment you can provide to your gear.
What would be your number one tip for keeping your camera safe while traveling?
I’d love to hear what your travel photography routine is like and how you keep your gear safe! Share your own tips in the comments :)