So you’ve got a new Fujifilm camera, and the next thing you’re wondering is exactly which accessories will help you take better photos, different types of photos, work more efficiently, be prepared, and stay organized?
I’ve got good news for you.
This post outlines the absolute best accessories for Fujifilm cameras. I own, use, and purchased everything in this guide with my own money, and am excited to show you the tools and techniques I use to take my Fuji gear to the next level!
As someone who’s been shooting Fujifilm for over 5 years, I’ve seen a lot of these tools evolve over time and can recommend you the latest versions that will work with your Fujifilm camera. I still believe that Fuji’s cameras are the best digital cameras for both beginners and pros.
So whether you’re still rocking the Fujifilm X-T1 or X-T10, or are looking for the latest and greatest accessories for your new X-T4, X-Pro3, or even an X-H1, I’ve got you covered.
Keep reading for Fujifilm accessories that I find useful, how to use them, and how to know whether they are compatible with your camera 📷
P.s. Got questions? Feel free to reach out to me on Instagram or send an email, and I’ll be happy to go into more details about how these accessories will or won’t work with your setup. I answer numerous messages every week about Fuji gear :)

Best Fuji Accessories
Before we go into my master list, I want to recommend here my top five must-have accessories, regardless of whichever of the Fujifilm cameras you’re looking to supplement. Here we go!

This full-size travel tripod compacts down to under 13" and weighs less than 1kg. Literally the most affordable carbon fiber tripod I've seen on the market, and over 1,000 excellent reviews. Goes everywhere with me!

I've fallen in love with this compact camera backpack after traveling Greece with it. Fits a 13" Macbook, configurable padded interior, and lots of color options from all-black to various canvas/leather combos.

Keeping your lenses clean is so important for the quality of your images. This kit contains my favorite lens pen, plus an air blower for removing particles from your lens.

A high-performance memory card is necessary to get the best performance your camera is capable of. At 250 MB/s, this memory car is suitable for both high-speed burst mode and shooting video.

This stunning lens produces dreamy bokeh and has incredible image quality. It's called the standard by which other Fuji lenses are judged for a reason. Read the article for sample images!
Ready for the rest of the list? Here are my favorite Fuji accessories that I consider essential for photographers in this system. Let’s go 🚀
How to get the best prices on Fuji gear: In addition to Amazon, I also encourage you to check on these two trusted photography sites: Adorama and B&H Photo Video . Sometimes they have better deals, sometimes Amazon has a better deal. I’ll link to all three options whenever possible so you can easily compare prices!
1. Vertical battery grip
Fujifilm has offered battery grips for its flagship X-T line of digital cameras since the beginning. I originally didn’t plan on getting one, but when I bought my Fujifilm X-T2, it came with a hand grip. I thought about re-selling it, but eventually I started to like the features it had. Whenever I buy my next digital camera, I’m pretty sure I’d also consider adding a hand grip.
Especially when I took it on safari with me in South Africa, it was completely invaluable for shooting wildlife that I could simply start the day with three batteries and not worry about needing to switch batteries during an exciting wildlife sighting.

Why is it useful? Having a battery grip has a number of different advantages. The exact features vary by model (I’ll outline that later), but here are a few things I’ve found really useful about having the battery grip for my Fujifilm X-T2:
- Holds 2 additional batteries – Transition seamlessly to a new battery when the one on your camera runs out.
- Easy access to boost mode – Use the BOOST mode to increase the number of frames per second (FPS) you can shoot. It also lets the X-T2 and X-H1 shoot 4K video for up to 30 minutes continuously. Boost mode is useful for sports, action, wildlife and video.
- Second shutter button useful for shooting portraits – Less awkward to reach the shutter when shooting in portrait orientation.
- You can charge 2 extra batteries through most hand grips – Making it really efficient to keep shooting even in situations that are demanding from the battery.
- Also weather resistant – Just like your Fuji X-T1, X-T2, or X-T3 camera. Same quality build you’re used to.
- Extra headphone socket – So you can monitor sound while filming, if you’ll be taking video with your camera.
NOTE: If you’ve just ordered the brand new Fujifilm X-T4 , you’ll need to wait a bit for the battery grip to come out!
Here’s how to find a battery grip for your camera model:
- Fujifilm Vertical Battery Grip for X-T3 (also on Adorama and B&H Photo )
- Fujifilm Vertical Power Booster for X-T2 (also on Adorama and B&H Photo )
- Vertical Battery Grip for X-H1 (also on Adorama and B&H Photo )
- Vertical Battery Grip for GFX-50S (also on Adorama and B&H Photo )
2. High-performance memory cards
So you’ve got a fancy new camera – but are you getting the best performance it offers? Unless you’re using high performance memory cards, there’s a good chance that they’re slowing you down.
If you’re using the Fujifilm X-T2 or later, you’ll want to get a UHS-II memory card (not a UHS-I!) and pay attention to the read and write speed (how many MB/s can be written to the card). This will affect how long you need to wait between taking batches of photos, and your ability to record 4k video.
I own tons of these high performance memory cards by Lexar and they’re invaluable for shooting wildlife and video. You can also get memory cards with even faster write speeds .
My recommended memory card is available on Amazon , Adorama , and B&H Photo . Memory cards often go on sale so check all three shops for the best deal 😉

NOTE: Even if your camera can’t fully utilize the UHS-II card (e.g. you have a Fujifilm X-T1, X-Pro1, X-A1 or similar), these cards are backwards compatible. So it may make sense to invest for the time when you upgrade your camera.
3. Lens and sensor-cleaning supplies
Not keeping your lens clean is like looking taking a picture through a dirty window – kinda gross. You’ll notice smudges in your photos, which is essentially impossible to fix in post, especially if it results in weird light spots. Having a dirty lens or sensor is probably one of the biggest image quality mistakes you can make with any digital camera.

Plus, if you’re outside in rain or snow, water spots on your lens can cause a similar effect. A water spot in the wrong place can ruin a photo! Luckily, there are a few tiny and affordable tools you can use to keep your lenses clean:
- Get a lens pen – Over 1,500 reviewers agree! The lens pen is a great way to remove fingerprints, dust, and debris from camera lenses. Also available on Adorama and B&H Photo .
- Get a neverending supply of lens wipes – These moistened wipes are useful for caked-on smudges such as dried water or stubborn oily fingerprints. Invaluable if you’re taking photos in rain and snow. The 200-pack is also available on B&H Photo .
- Get a compact air blower – After using your lens pen to loosen dirt and debris, blow it off the lens using an air blower. Never blow on your lens or sensor with your mouth, as it causes moisture to be left behind! You can also get this air blower on Adorama or or on B&H Photo .
And that, my friend, is your three-part lens and sensor-cleaning system 👌
4. External hard drives
If you’re shooting RAW (and I hope you are!), you’ll soon find that the hard drive in your computer starts to fill up fast when storing photos with high image quality. Plus, without a backup, you’re at the mercy of your computer continuing to operate perfectly in order to access your photos.
The reality is this: hard drives go bad. That’s why it’s important to have a backup!
Here are two types of hard drives I use to back up my photos, and my strategy to make sure my multiple terabytes of photos and video files are safe!

Option 1. RAID Hard Drive. A RAID drive is basically a setup where you have two hard drives, and one of them is a replica of the other. So anything you write to one drive is also backed up on the other. What it means is that if a drive goes back, you can always restore from the other drive.
I use this RAID hard drive by Western Digital in 8 terabyte capacity. That means two 4 terabyte drives, one as an automatic replica of the other. You can independently replace or upgrade them, and it has a USB-C connection for fast transfer. It’s pretty easy to set up and gives me peace of mind!
Option 2. Portable Hard Drive. While traveling, I always unload my day’s photos and videos on this portable external drive , also by Western Digital. It’s not the smallest on the market, but it’s a great value for the money. I own the 2TB version, which is more than enough to hold a trip’s shoots until I’m home to offload on the RAID drive!

5. Spare batteries
I’m not going to lie: Fujifilm’s batteries are expensive! But it’s really up to you whether you want to use 3rd party batteries. Most people will advise you to go for after market batteries rather than aftermarket chargers.
- Fujifilm NP-W126S : Compatible with all of Fuji’s main models: FUJIFILM X-H1 / X-Pro2 / X-Pro1 / X-T3 / X-T2 / X-T1 / X-T30 / X-T20 / X-T10 / X-T100 / X-E3 / X-E2S / X-E2 / X-E1 / X-M1 / X-A7 / X-A5 / X-A3 / X-A2 / X-A1 / X-A10 / X100F. It’s an improved version of the original NP-W126.
- Wasabi Power Battery : 3rd party batteries that can be charged via the Fujifilm charger that came with your camera. Click through to see the compatibility table on Amazon.
You can check the price here , or check on Adorama , or on B&H Photo . At time of writing, Amazon was $10 cheaper, but always good to check!

NOTE: The new Fujifil X-T4 uses a different battery than the until-now standard NP-W126S.
Do keep in mind: most of these camera batteries do not come with additional chargers! Being able to charge multiple batteries at once is really important, especially if you want to let your gear charge overnight.
Keep reading for a few useful types of chargers you might want to pick up.
6. Battery chargers
Battery chargers. Not so sexy, but extremely useful for any digital camera. Imagine you’ve finished a long day in the field, and need to get up early the next morning to keep shooting. Your batteries are drained.
But without spare chargers, you’re going to be waiting over TWO HOURS per battery for it to finish charging. If you want to charge three batteries with just the single-capacity charger your camera came with, that’ll take six hours! And goodness forbid you forget to start charging until right before bed, you’ll only have one fully charged battery for the next day.
I’ve done that to myself and it’s very annoying to run out of battery! Here are a couple of options for spare battery chargers:
- Pick up another official Fujifilm charger – Not cheap but it does cost less than the batteries!
- Get an aftermarket charger – It’s cheaper, charges two batteries at once, and can charge via USB (meaning you can charge it with an adapter in your car).
Personally I just use 2 official chargers and my battery grip (meaning I can charge 4 batteries at once and be done in 2 hours), but there are 100% times where I wish I had a charger I could use in the car! Being able to charge while driving would be a huge advantage if you’re often commuting to shooting locations or even just on a road trip.
TIP – If you’ve ordered a new Fujifilm X-T4, you can charge the battery via USB-C. However, I always recommend having spare batteries you can charge. Pick up the new dual charger on Adorama (so far the only place it’s available to pre-order).
7. Filters (UV, ND, Polarizing)
If you’ve never used filters on your lenses before, let me do a quick rundown of how filters work, different types of filters, and how to choose a filter that’ll fit your Fujifilm camera lens.
What do filters do? Fundamentally, filters cut out different kinds of light. A UV filter cuts out UV light, whereas an ND filter cuts out a certain amount of light, and a polarizing filter helps you get an evenly exposed photo during broad daylight. But all of them cut out some kind of light from reaching the sensor of your lens. Some people are worried about filters affecting your image quality, but the good ones will have little to no effect.
Here’s how a typical UV filter might look:

What are the different kinds of filters? There are three main types of filters: UV, ND, and polarizing filters.
- UV Filter – These days, many lenses have UV filtering built into them,
so you’ll usually buy a UV filter to help protect your lens from scratches. The important
thing is you need to buy a high quality filter so your photos don’t look worse because
you added an extra lens in between. Most of my lenses have an ND filter on them for protection.
- ND Filter – ND filters, also called neutral density filters, help you cut out light
so you can leave open the shutter for longer and achieve a desired effect. That could be something
like a smooth waterfall, where you need a long exposure in order to get the water to look the way you want.
These filters cut out varying amounts of light, and you need to decide how many “stops” you want
the filter to cut out.
- Polarizing Filter – Polarizing filters are useful for darkening skies or handling reflections in water that take over a photo. Your best bet for using these will be during broad daylight, when the shadows and highlights have a lot of contrast. This article about why you need a polarizing filter for landscape photography does a great job showing the difference a polarizing filter can make.

Which brands of polarizing filters are best, and how should I pick one? The first important thing to know is that there are two kinds of filter system: those you screw on to your lens directly, and those that are literally glass plates that are mounted in front of your lens (called “bayonet filters”).
The good thing about screw-on filters is that they’re pretty compact, but the bad thing is you need to buy multiple because each filter only fits a certain size of lens. While glass plates are great for reusing them across lenses, but are bulkier ot carry around and more expensive.
You choose a filter based on the filter size of whatever lens you own. If you look on the Fujifilm website and click the lens you want to buy a filter for, and then click “Specifications”, you’ll see a section that looks like this: “Filter size / ø58mm”. Those 58mm tell you that you need to buy a 58mm filter!

Here are the top three brands for buying lens filters for any kind of camera lens:
- Hoya – Has a huge collection of filters in all kinds of sizes and quality levels. Their basic line is called Alpha, and you can find more expensive variations called NXT/NXT Plus, EVO, and HD3. Click here to check the price of Hoya filters (or on Adorama or on B&H Photo ).
- B&W – B&W is a German brand, and therefore easier to buy in some markets. They’re usually a little more expensive, but hey, the Germans are known for quality and these lens filters are no exception. Click here to check prices for B&W filters (or on Adorama or on B&H Photo ).
- Tiffen – Tiffen is also a popular lens filter maker, and an American brand. Tiffen has even won Academy Awards and Emmys for their filter designs. Click here to check prices for Tiffen filters (or on Adorama or on B&H Photo ).
Click any of those links and just add the filter size to the end of the search term, such as " 58mm”.
I own filters by all three of these brands, and I can’t tell you there is a major difference. If you choose filters by one of these brands, you’ll probably be in the clear. I would avoid getting any filters like “Amazon Basics” style. Filters directly affect the image quality of your photos, so a little investment is well worth it.
8. Filter case
Now that you’ve got all these fancy filters, you need somewhere to store them! I personally use screw-on filters, and each one comes in a plastic container which can get really bulky when you own a lot of filters. That’s why I picked up a filter case, which keeps them safe and organized and easy-to-find.
This filter case is affordable and has room for six filters, which is perfectly fine to start.

9. Travel tripod
I literally NEVER travel without my travel tripod. Sometimes I even bring two, a normal travel tripod and a mini tripod for quicker set up. Having a tripod enables you to take photos you simply cannot capture without one.

Why every photographer needs a tripod in their arsenal:
- Long exposures – Want to capture an epic waterfall shot where the water looks like a curtain of silk? You need an ND filter and a tripod for that!
- Selfies or couples shots – Sometimes no one is there to take your photo, or wouldn’t be able to capture it the way you want. A tripod is an essential tool for getting excellent photos while traveling, or just getting consistent photos.
- Sharp landscape photos – You might know that landscapes are often taken with very low aperture settings (such as f16) because that allows you get the most details in the photo. With such a low light setting, you’ll have blurry photos if you don’t use a tripod to take the shot.
I’m convinced that my travel tripod is the BEST tripod deal on the market. It’s affordable, carbon fiber, weighs under 1kg, comes with a carrying case a strap, and has been super rugged over the last few years.
Read my full review on my Rollei travel tripod or just read the review on Amazon . Or ideally, do both!
10. A Fujifilm wide-angle lens
Without a doubt, the most important add-on to any camera is the camera lens. Having a high quality lens can make even amateur photos look that much better, and you don’t need to be a professional photographer to benefit from a high quality lens.
As I talk about extensively in my post on the best Fujifilm lenses, camera lenses will outlive your camera multiple times over, so investing in lenses is key!

Possibly my most-used lens is the Fujinon XF 16mm f1.4 WR , which is universally considered one of the best Fujifilm lenses the company has ever made. It’s super sharp, has a stunning maximum aperture of f1.4, and has an ultra-close focusing capability that makes for really interesting pictures.
Here’s an example of a photo taken with that lens.

(I’ve even written a detailed review of Fuji’s 16mm f1.4 WR lens if you’re looking for tons more sample images and an in depth look.)
Especially if you travel or love taking landscape or cityscape photos with architecture in them, the 16mm lens is a godsend. There’s also a newer, smaller, and cheaper 16mm lens , however it is only an f2.8 maximum aperture instead of f1.4. A great choice if you are on a budget, though my love for the original is undying. I mean it.
Check current price for Fuji's 16mm f1.4 on Amazon
Compare prices with the Fujifilm 16mm f1.4 on Adorama and the Fujifilm 16mm f1.4 on B&H Photo . Usually the prices are the same, but every once and a while you can find deals 😉
11. An everyday lens
If you ask me, the Fujinon XF 23mm f2 WR is possibly Fujifilm’s most underrated lens. While it doesn’t necessarily have the same ultra-high image quality as the 23mm f1.4 version , the f2 is so small, compact, and weather reisistant that it’s the perfect every day traveler’s companion.
Use a 23mm lens for: Street photography, general purposes, everyday lens

If you’re the kind of person who wants to carry your camera around with you in your bag without developing back problems, then opting for a light everyday lens makes a lot of sense. You can capture about 90% of the type of photos you might want to take using this lens, making it both really versatile and convenient.
Plus the fact that it’s weather resistant means you can confidently bring it places you’d never want to bring a lens that costs twice as much and doesn’t have weather sealing, like this waterfall..

The f2 at a 23mm focal length even lets in a decent amount of light and works better in low light than you might expect. Perhaps you don’t really need that extra f1.4 if you’re more interested in something lightweight.
Check current price for Fuji's 23mm f2 on Amazon
Compare prices on Adorama and and on B&H Photo
12. A pancake lens
Did you know that tiny lenses like this are often called pancake lenses? Because they are flat and compact like a pancake! If you’re looking for a lens to put on your camera to bring your camera with you anywhere, this would be a great lens for that. It’s so light it feels like nothing around your neck.
Even though the Fujinon XF 27mm f2.8 isn’t the only pancake lens that Fuji makes, it’s the best balance of size and image quality. You can also read my full review of Fuji’s best pancake lens.
Use this lens for: Street photography, keeping a low profile, minimalist setup

This little lens can take super sharp landscape photos without the need to carry around a big lens, and isn’t too wide for portraits either.

Check current price for Fuji's 27mm f2.8 on Amazon
Compare prices on Adorama and and on B&H Photo
13. A fast prime lens
When talking about the kinds of lenses every photography should own, you’ll definitely hear it say that a “fast prime” is a critical piece of kit. But what does it mean to have a “fast prime” lens?
Let’s break this down in two parts. What does it mean for a lens to be “fast”? That means that it has a wide maximum aperture, which in turn means that the lens is able to collect a lot of light. The aperture of a lens is measured in f-stops, and the smaller the number is, the more light-gathering ability a lens has.
For example, the Fujinon XF 35mm f1.4 R can gather a lot of light thanks to its f1.4 aperture. In fact the only lens with a wider maximum aperture is the next lens in this list, which has a maximum aperture of f1.2. The amount of light gathered is a calculation of the f-stop and the focal length, but for all intents and purposes, an f1.4 lens is FAST. Very fast.
Use this lens for: General purpose, low light, amazing bokeh

So then what’s a prime lens? A prime lens is a lens that doesn’t zoom. While zoom lenses can be useful, prime lenses usually have better image quality. As with everything in life, it’s about tradeoffs. But Fujifilm is famous for their stunning prime lenses, and it’s most famous lens (and possibly my all-time favorite lens) is their magical Fujinon XF 35mm f1.4 R .
Here’s an example of an image you can capture with this lens.

That beautiful blurry background with cicular shapes, known as bokeh, is a hallmark of fast prime lenses. You can still take photos with the entire background sharp as well, but the extra flexibility of being able to blur it out leads to beautiful subject isolation.
If you’re on a tigher budget, consider the Fujinon XF 35mm f2 , which is smaller and weather resistant.
If you’re on the tighest budget, consider pre-ordering the brand new Fujinon XC 50mm f2 (available to pre-order on Adorama or pre-order on B&H Photo ). Initial reviews are great and it costs less than half of either of the other 35mm lenses.
The main difference is that the XC lens is made of plastic and is not weather resistant. It’s meant to be an entry-level option for getting into Fuji’s prime lenses.
Check current price for Fuji's 35mm f1.4 on Amazon
Compare prices on Adorama and and on B&H Photo
14. A Fujifilm portrait lens
My top choice for a the best Fujifilm portrait lens is the Fujinon XF 56mm f1.2 R . It’s got stunning optics, and is considered one of the sharpest Fuji lenses on the market. I use it both for taking portraits of people, but also as a “mini” telephoto lens when traveling. The 56mm end of the lens is surprisingly versatile.
The drawbacks of this lens are that it’s a little slow to focus. Usually not a problem for portraits as you’re not shooting action though. It’s also a little bit big and bulky. Still, the photos are magic (scroll for sample images!).
Use this lens for: Portraits, fashion photography, out-of-this-world bokeh, short telephoto lens

Alternatives: Best Fujifilm portrait lenses
- Fujinon XF 50mm f2 WR – At literally half the price (and half the weight!), this lens is a great budget alternative. Stunning image quality, it will work for most people. Plus it’s weather resistant!
- Fujinon XF 90mm f2 WR – Costs about the same as the 56mm f1.2, but at 90mm the background compression effect is more serious and it’s weather resistant.
- Fujinon XF 80mm f2.8 R LM OIS WR – Fujifilm’s first 1:1 macro lens can also function as a portrait lens, though some say it might be too sharp for portraits! Something generally fixible by turning the clarity down in lightroom a bit. If you’re interested in both macro and portraits, this could be a really interesting lens for you.


Check current price for Fuji's 56mm f1.2 on Amazon
Compare prices on Adorama and and on B&H Photo
15. A Fujifilm telephoto lens
My favorite Fuji telephoto lens is the Fujinon XF 50-140mm f2.8 WR . I’m not going to lie, this lens is a bit of a beast. It’s larger than my head (though that’s not to say I have a particularly large head). That said, I’m not a big girl, and I had no trouble wielding this lens while I was on safari to take wildlife photos.
Yes, the lens is heavier than any of Fujifilm’s prime lenses, but there are photos you can’t capture without it. Cropping a photo can only get you so far. If you’re going somewhere in nature where you think you’ll see some animals, I can’t recommend anything more than to bring a powerful zoom lens with you.
Use this lens for: Wildlife, safari, nature, portraits

This photo shows BOTH the 50-140mm attached, as well as the 2x teleconverter. Without the teleconverter, it would be about 2 1/2 inches shorter.

Alternatives: Fuji’s other telephoto lenses
- 100-400mm f4 is the main alternative if you’re specifically looking to shoot wildlife. The real question here is whether you want something portable or you care about getting CLOSE. For mega, mega close photos, you’re going to need the 100-400mm lens. But if you are looking for a flexible middle ground, stick with the 50-140mm.
- 55-200mm f3.5-f4.8 is probably considered the best bang-for-your-buck zoom from Fuji. Pros: Affordable, great range, great image quality, comparatively lightweight. Cons: Not weather resistant, not as wide aperture, cannot be extended with a teleconverter. It has consistently stellar reviews on Amazon and around the web despite those tradeoffs.

Check current price for Fuji's 50-140mm f1.8 WR lens on Amazon
Compare prices on Adorama and and on B&H Photo
16. Fujinon TC WR Teleconverters
If you’re not familiar with teleconverters, they’re basically like a lens that attaches to an existing telephoto lens to give it even more “zoom”. This comes at the cost of cutting down the amount of light that gets into the camera, but sometimes that extra reach is extremely important for landing the shot.

Teleconverters can make an existing telephoto lens more versatile than it would be on its own. Imagine you have a lens like the Fujinon XF 50-140mm f2.8 WR . Even though 140mm isn’t extremely far if you want to shoot wildlife photos, a 2x teleconverter can get you up to 280mm worth of zoom.
This photo for example was taken using that lens and teleconverter combo from the front seat of a car. Looks pretty good huh?

Fujifilm has two different teleconverters that’ll give you different reach, and cut different amounts of light:
-
Fujinon XF 2x TC WR
– This teleconverter
muliplies your focal length by 2x, meaning that a 50-140 lens would become like a 100-280mm, and a
100-400 would become 200-800mm. This comes at the cost of cutting the maximum aperture in half,
for instance if the maximum aperture of your lens is f2.8 then it would only be f5.6. In most
well-lit scenarios, this is plenty of light. This is the teleconverter I used on safari, which works
great with the 50-140mm for a variety of wildlife situations.
Check prices on: Amazon , Adorama , and B&H Photo -
Fujinon XF 1.4x TC WR
– Maybe you
want to have more light inside of more reach, in which case the 1.4x teleconverter is a better fit.
It’ll convert the 50-140mm to an 70-196mm f4 and the 100-400mm to an 140mm-560mm f6.4-8.
Check prices on: Amazon , Adorama , and B&H Photo
These teleconverters can be used only with the following lenses: XF 80mmF2.8 R LM OIS WR Macro , XF 50-140mmF2.8 R LM OIS WR , and XF 100-400mmF4.5-5.6 R LM OIS WR .
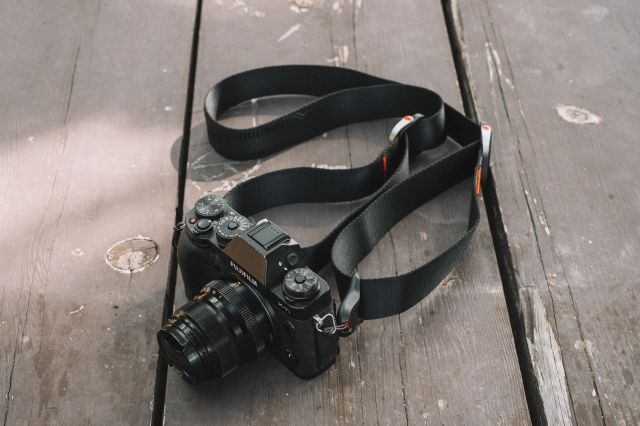
17. A mirrorless camera strap
One of the most important things you can do for your camera is to get a robust camera strap! That’s because your camera strap is the only thing that keeps your expensive electronic baby from smashing into the pavement. In fact, exactly that has happened to me from the cheap camera strap I used to use: the strap broke and my camera went a-tumblin’. Luckily it was OK (because Fuji cameras are so rugged!) but still…I’ll never make that mistake again.

I own two of Peak Design’s Slide Lite camera straps and love them for a couple of reasons:
- Robust build and highly durable
- Easy to detach from camera (e.g. when the camera needs to go on a tripod)
- Convertable from neck strap to cross-body setup
They’re not cheap per se, but a lot cheaper than having to send your camera in for repair 💀 These straps come in both black and silver, so you can match it to your Fuji!


18. A Fujifilm screen protector
Protecting your screen is a cheap way to keep your expensive gear safe from scratches that can happen in the field or in your bag. These protectors by Expert Shield have a lifetime warranty, and come in sizes for all kinds of Fujifilm lenses.
They have three types: Anti-Glare, Crystal Clear, and and Glass. Crystal clear looks the same as what you have today, whereas anti-glare will reduce the detail in the LCD screen a little. Glass is the thickest and most durable.
- Expert Shield for Fujifilm X-T3
- Expert Shield for Fujifilm X-T2 and X-T1
- Expert Shield for Fujifilm X-H1
19. A flexible, mini-tripod
Having a mini-tripod is great for traveling, especially when you don’t want to carry a full-sized one or you want to be able to easily fit a tripod inside your backpack. I recommend this particular Gorilla Pod because it has a handy plate you can attach to the bottom of your camera, unlike many Gorilla Pods where you have to unscrew it entirely from the camera in order to detach it. Way faster to use, and a more robust system in terms of attachment!

This one also allows you to take portrait mode photos, unlike some of the other Gorilla Pod tripods. Being able to shoot portrait is a must-have for anyone who’s taking pictures of themselves while traveling solo 👌
20. An Fujifilm-compatible microphone
If you’re just getting started in video, you might not know that the best sound doesn’t come from using the built-in mic on any camera – you need to use an external microphone for optimial results.
If you’re filming out in the world, you’ll probably want to get what’s called a shotgun mic (meaning it attaches to the top of the camera, and that’s the source that picks up sound). If you’ll be doing interviews where you can attach a microphone to yourself or your interviewee, you’ll probably want a lav mic.
I spent a lot of time searching for an affordable microphone for my Fujifilm camera, and ultimately decided on the Rode VideoMicro . It’s both extremely affordable and has better ratings than some of their more expensive options.

The VideoMicro is an on-camera microphone (so, a shotgun mic). If I were looking for a lav mic, I’d probably go with Rode's Lavalier GO which is an affordable wired lav mic. If you want to go wireless, it’ll cost more to get the wireless version .
The VideoMicro I mentioned first uses the battery of your camera to power it, rather than having an external battery. That can be a good thing or a bad thing 😉 If you want something with its own battery to avoid drawing from the camera, check out the Rode VideoMicPro .

So far, I’m loving the quality of the Rode VideoMicro . You can even use a audio / mic splitter cable to adapt the VideoMicro for use as a mic with your computer!
21. A mirrorless camera backpack
I just got back from spending about a week in Greece, and it was my first time taking my new Ona backpack on a trip. I’ve been using it while commuting to and from my coworking space, but it was my first change to judge the practicality, usefullness, capacity, and quality in the field.
That trip made me a big fan of the ONA Monterey backpack . It fits a 13” Macbook, 4 lenses, a camera with lens attached, my filter case, my mic, computer charger, bag full of accessories (cables, memory cards, flash mounts, all the little bits and bobs), plus important bits like my wallet and headphones.

The bag is definitely quite compact. If you’re going to be bringing telephoto lenses with you, I’d recommend buying the Camp's Bay instead, because it’s a bigger bag.
Otherwise, it was perfect for a week-long trip and I was able to fit everything I needed inside while walking around during the day or heading somewhere to work from a cafe.
Compare prices for the ONA Monterey: Amazon , Adorama , B&H Photo , and Ona's online store .

22. A small mirrorless camera bag
This is ONA’s smallest camera bag they’ve made: The Bond Street .

This camera bag is very compact: it can hold a mirrorless camera with lens attached, a spare lens, has a front and back pocket where you can put your phone and keys, and you can also fit your wallet inside or a collapsable jacket.
Despite being small, I think if you’re traveling in Summer and don’t need to keep an extra sweater with you, it’s a great option that helps you stick to a minimal travel photography kit. I actually used this bag while I was taking photos on safari because I knew I basically only needed a telephoto and a wide angle lens.
Compare prices for the ONA Bond Street: Amazon , B&H Photo , and Ona's online store .
23. A full-size mirrorless camera bag
Sometimes you just need to be able to haul around everything you own. Whether you’re traveling to a particularly challenging location, or you’ll just be shooting in diverse situations. Needing to bring along absolutely everything – well, it just happens sometimes.
Tragically, the camera bag that I love the most has been discontinued! So I can’t link you to it. I won’t spend too much time raving about how much I love it (but spoiler alert: I absolutely love this bag). But I will share similar bags that could be a good substitute.
Here are two bags with comparable features for both men and women:

Capacity for a 13" laptop, 3 lenses and a camera plus accessories. Additional from pockets and back slip which fits a tablet. Messenger bags can be very convenient for grabbing gear on the go! Canvas and leather options.

What I love about ONA's bags is that they don't look like camera bags. This new version of their popular Capri holds a laptop, camera, and lenses, and has a convenient back zippered compartment.

24. A table-top tripod
I just recently picked up this ultra compact table-top triopod by Manfrotto, called the Pixi. It fits in the side pocket of my camera backpack and is super useful for shooting long exposures or selfies when you don’t have a ton of space. It’s one of Amazon’s best-selling tripods, and even if it doesn’t replace a full-height tripod completely. It’s fun and super easy to use, I’m loving it so far.
25. A gimbal for mirrorless cameras
If you want to get smooth video footage, there’s a lot you can accomplish with lenses that contain OIS (optical image stabilization) and with cameras with IBIS (in-body stabilization) such as the new Fujifilm X-T4 or the Fujifilm X-H1 .
But those things can only get you so far, if you want to have shots where you’re walking and following people. For professional (or professional-looking!) video, getting a gimbal is a good investment.
DJI are probably the best-known in the game for making gimbals that are still affordable to consumers but with great results. Here are its two most popular options:
-
DJI Ronin-SC
– Smaller and
lighter, this gimbal is made for mirrorless cameras. Best for mirrorless cameras with small to medium-sized lenses.
- DJI Ronin-S – Suitable for both mirrorless and DSLR cameras, and will help you handle larger or longer lenses.
26. Remote control shutter release
Whenever you’re using a camera on a tripod, you might want to be able to trigger the shutter without being behind the camera or without touching the camera (which can introduce shake in your photos!).
Personally I usually use the Fujifilm app on my phone, however this can somestimes be inconvenient because it uses a lot of your phone’s battery to be communicating with and controlling the camera over WiFi.
The important thing you can with one of these is timelapses. Let’s say you want to capture star trails, or be able to take a timelapse of just about anything and then merge the photo in post. A remote control shutter release will let you do that.

27. Long eye-cup
If you’re someone who wears glasses like me, you mind find it useful to have a longer eye-cup. Instead of having to smash your face right up to the rear LCD screen, you can give yourself a little extra space by replacing the default eye cup on your camera.
I especially recommend getting this if you’re still rocking a Fujifilm X-T1! You can check prices for the X-T1 eye cup on Amazon and enjoy the extra room. Also available on Adorama and B&H Photo .

More Fujifilm accessories?
Looking for more awesome Fuji accessories? You can check out this official list of accessories that are made by Fujifilm directly.